April 3, 2014

Soldering Mistakes & Flops

It's been a few weeks since I sat down in my studio space and started working on anything.  We spent a week in Washington D.C. where I experienced my first real snow.  I've played in the snow a couple of times at Mammoth Lakes, just south of Yosemite, but the snow had fallen long before we arrived and the sunny skies were melting it quickly.  In this case I went to bed at the end of a sunny day and woke up to about a foot of snow.  It was beautiful!  We tromped all over the city and were stunned to find nearly everything closed because of the snow.  The streets, sidewalks and parking lots were clear.  If this Southern California girl can stomp a few miles in snow, I'd think the locals could drive to their jobs and open things like the Library of Congress :-(  In any event, I did get to nail my husband with many, many snowballs.  After a while, he got a bit annoyed and suggested perhaps he'd had enough.  I suggested he move along a little faster.  Bahaha!

Got him!  And look at all of that ammo coming up on the left ;-)

There were a number of people sledding on the little hills of snow alongside the Capitol building
 
So I'm back in the studio and decided that in order to get better at soldering, I've got to practice.  Usually, I'm one of those people that are OK realizing that it takes a while to get good at something, practice makes perfect, and all that rot.  There are some things about which I wonder if any amount of practice will ever result in my getting good, forget perfect.  Those things are cooking and soldering.  I can cook OK, but I think it's just OK.  No one has died yet and I was going to say no one has ever spit anything out, but there was that veal scampi I made a couple of years ago with what turned out to be nuclear-like pucker power.  My daughter spit it right out on her plate and has refused to eat that dish ever again.  It really was tart, I'll admit, and I've learned that lesson and have made the dish a few times since with significantly better results.  Did I mention that she was a college grad at this point?

Before
Before (the other side)
The soldering is another story.  I took pieces that I made a while ago and tried to fix them.  I use the term "fix" loosely.  If I were to go back and re-read the books or articles I've explored in the past, I'd probably find that I did everything described as a "common mistake by those new to soldering."  The sides are lumpy and, no matter how hard I try to make them smooth, all sides are inconsistent in terms of thickness.  If I try adding solder to a side that has what looks to me like too little solder, it drips down the sides or flows over the back (too much at once?) or liquifies and thins out further (too much heat on one spot or moving too slow?).  This is going to be an expensive learning curve if I keep plowing through the solder at this rate of speed, but there is no other way to get better.  I will NOT repeat the same class I've taken twice.  If at first you don't succeed, don't keep doing that thing that didn't work over and over again.  It looks so darned easy when I watch those darned YouTube videos. 
The "after, but not finished" versions
 This is when I want to sew.  When I sew, I know what I'm doing.  Sometimes I make a mistake, but I know what I did wrong, know how to fix it, and enjoy the almost meditative state of mind that comes with cutting, sewing, cutting, sewing. 

Tomorrow I'll give it another try.  The inexpensive glass I bought when I picked up those cheap picture frames at a discount store will help reduce the cost of learning.  There's no point in using less expensive solder - poor quality supplies will result in a poor quality finished product.  I have learned, however, that cheap magazine pictures or scraps of wrapping paper make a perfectly suitable insert.  There's no need to waste an original little painting.

Since I did not at first succeed, I will try again.  Sigh.

February 19, 2014

Art Instructors Still Scare Me

I know I've blithered on about this before, but I only took one art class in my adult life until recently.   It's the one where we were supposed to draw three objects and the art teacher took my sketch pad out of my hand, gave me a big, fat red "F" and tossed the pad back.  Trying to get over that fear when I am already  so insecure about my art is HARD.  Last year I pushed myself and took the soldering class, believing I did OK.  I didn't start a fire and came home with some finished work.  I've practiced a bit, know I have a lot to learn still, but kept at it anyway.  This last weekend I took another soldering class.  The subject was the same - basic soldering - but the project was different. 

One thing I must say is that I don't want to hurt any feelings (or get caught for busting anyone's chops, frankly), so I feel like I have to write in code.  Darn.

The project for the class is a multi-panel standing photo frame with curly wire decorating the top.  I've blurred out the faces of the sample project since it's not my photo.


This most recent class was hard for me because I thought I was coming into it a step ahead, having taken the soldering class last year.  But so many little things throw me off - getting the supply list so late that I couldn't get everything I wanted to bring vs. having to beg or borrow at the class.  There were things on the list we were not to use, and things not on the list that it would have been good to have.  I'm not sure if the instructor assumed we know how to do things like cut glass, but I found it very intimidating and, frankly, I really suck at it.  She finally cut it for me (it was a challenging shape and I'd never done it before, so I broke a few pieces and felt like an idiot).  Then I was afraid to point out that the two pieces she cut weren't the same shape/size which they need to be because they are the sandwich for the photos being soldered and I didn't know how to fix it.  I figured I'd fudge and just bulk up on the solder when she wasn't looking.

In the end, I felt good that I never burned myself, I only cut one finger (note: flux hurts like mad in a cut!) and think I did a decent job of soldering.  I got all of the emails this time and confirmed the potluck (missed that one last time), and managed to bring something I thought was yummy that wasn't a salad.  (Not that everyone else bringing a salad was bad because they were really good salads).

So I'm tippy-toeing here, trying not to snark or come across as a smarty-pants critical, but I am just having such a hard time getting past being so nervous around snappy teachers that I'm struggling with the notion of going back for another class.  A couple of the other attendees (SO much more experienced than I) were SO nice, encouraging me to come to more classes, get over the fear and just get out there.  The instructor did not.  Am I back in high school and reading too much into this, being a paranoid big baby?

In any event, today I worked on putting on the jump rings.  I've learned that spring loaded needlenose pliers suck for this job and the rough end of a wire cutter works great.  I learned I should keep an antibiotic ointment with a pain reliever and bandages in the studio.  One more cut - ouch.

This is what I've got so far.
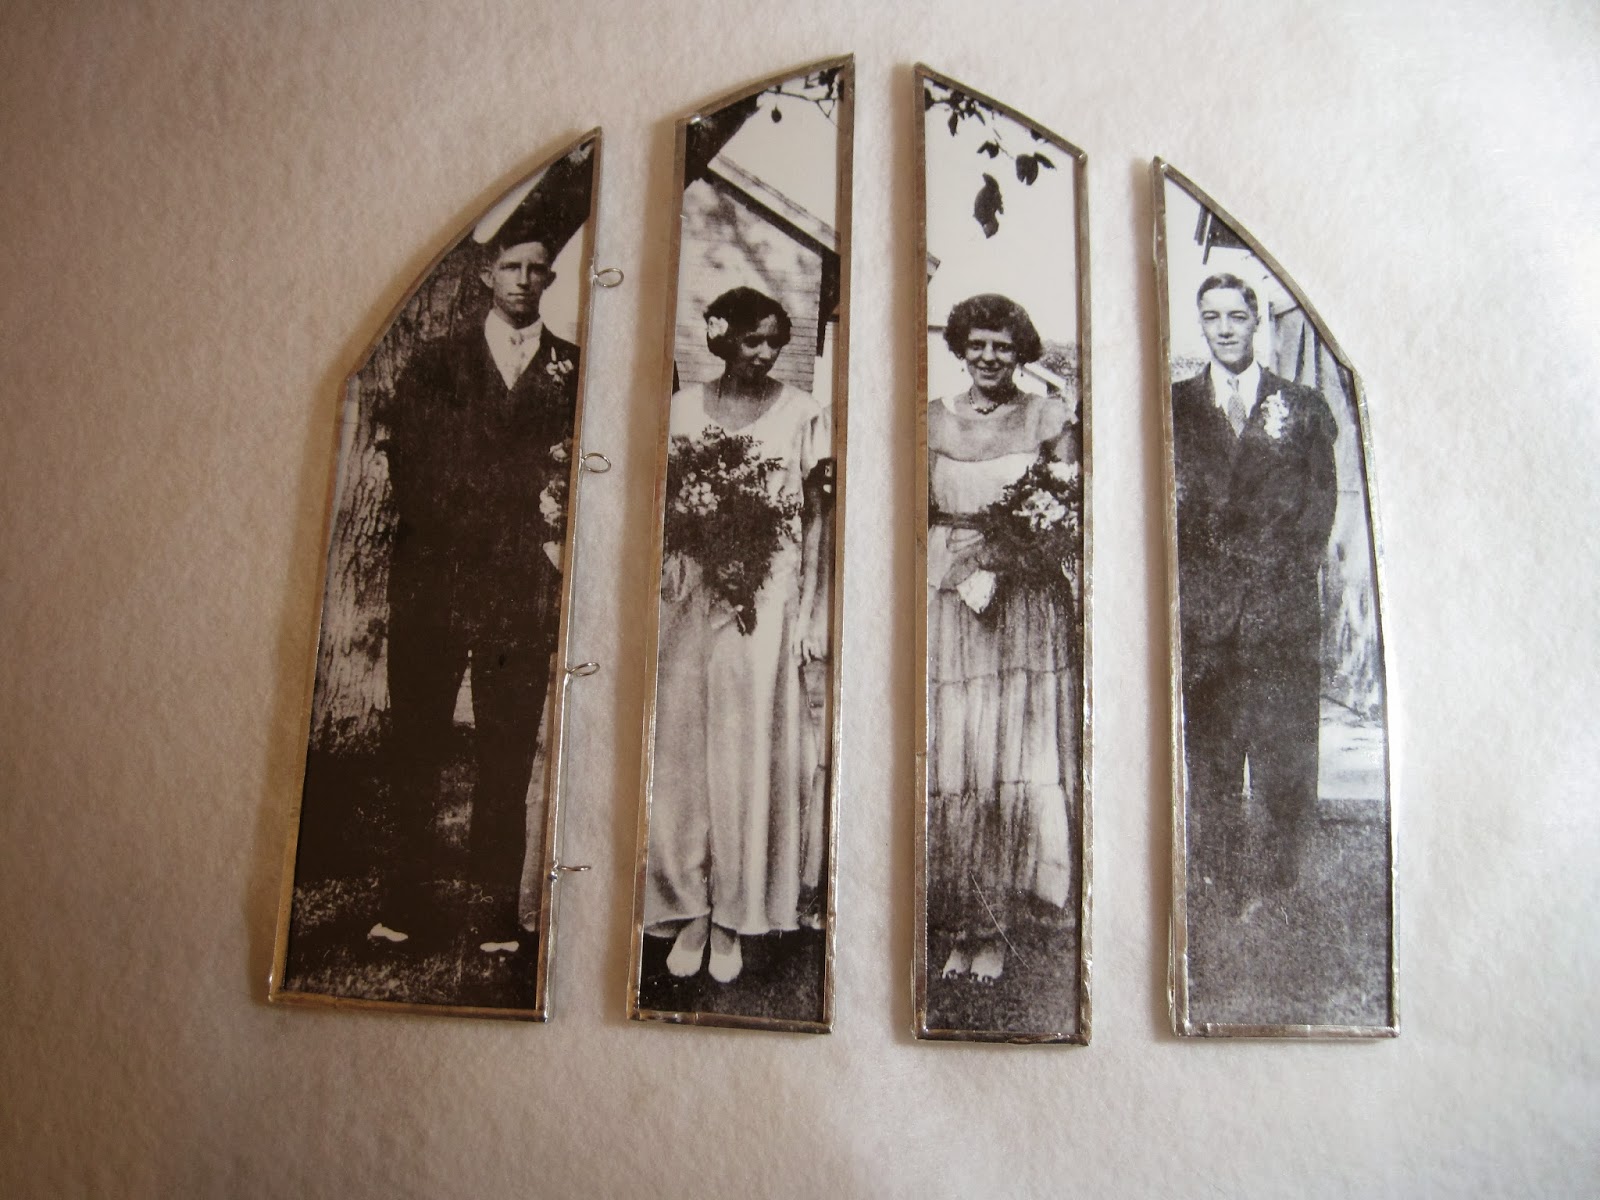
Starting to add the jump rings

Back of the panels
The photograph has a very sad story behind it.  The groom on the far left was my mother-in-law's brother.  His bride, to his right, died very soon after they were married.  The other woman in the photo is my mother-in-law.  They are all deceased, so we don't know the details of the story other than that Lawrence outlived his next wife (of many, many years), and pre-deceased his last wife.  He and his sister, my mother-in-law, died within six days of each other.  It was such a sad time.  I wanted to pay homage to them by creating this piece and hope it comes out well.  I should note that the backing paper was a fun project.  The center two panels were creating using gradients on a transparent background in Photoshop Elements.  The fun thing is that you can make a single page, then make a million variations of it by simply tweaking color & saturation.  That was the least stressful part of this project.

So the lesson I'm trying to take from this experience is to just try to stop hearing snark or criticism, focus on the learning, and keep moving ahead.  Oh, and stop being a paranoid big baby.

January 29, 2014

Orange County Housewife & Cat Nanny

It's been a year since we moved, and I still haven't adjusted to the Orange County housewife gig.  I remain, as far as I can tell, the only housewife around town that drives a Honda Odyssey van but isn't someone's housekeeper.  I'm probably the most plus-sized housewife in town.  I've had no injections other than that for the flu shot.  I have been known to wear Old Navy flip-flops to the grocery store.  I don't have a housekeeper.  OK, not yet, but need help with this big house and wicked arthritis.  I don't like spas.  I do my own mani/pedi and not on a regular basis.  I live in a small city that doesn't allow door-to-door solicitors other than by those who have applied for a permit to do so here, and even then homeowners can opt out, but a few still sneak around town.  I never knew such a thing existed as a city-wide ban on solicitors.  This week one of the sneaky variety came to the door and, as usual, I was dressed for the studio and had plaster all over my hands.  He said he was stopping by to chat with the homeowner about reducing electric bills.  I stopped him and told him I was not the homeowner and they weren't home, that I was the cat nanny.  He muttered "cat nanny" and made a notation on his little clipboard and said he'd come by another time.  He took it seriously.  O.M.G.  Now I'm actually looking forward to the next sneaky solicitor and have to come up with something better than cat nanny since I Googled it and there ARE cat nannies!  What ever happened to just plain old pet sitters?

On the mom front, the empty nest thing remains a mixed bag of emotions.  The kids are both old enough that even when we're home together, we aren't really together.  My son is usually holed up in his room playing video games (insisting that it is now related to his college major of software engineering, and thus qualifies as in-depth and intense study time that should not be disrupted with silliness like meals) along with making it dirtier.   The older of the two is usually busy studying (for real) for her last semester of grad school if she's home at all with her busy work and school schedule.  Me, I'm scooping the litterbox again.  Ah, the joys of motherhood.

On the art front, the week has been slow in terms of creative time.  My husband accompanied me to the Road to California quilt show which was extraordinarily crowded.  I couldn't decide which I needed more after the first aisle, an air horn or a martini.  There were a lot fewer quilts showing and a lot more vendors than in years past, but it was still worth the trip.  This week I'm busy painting a bathroom, once again with a looming party as the impetus to get something done.  I haven't painted in our house myself for about two years and had forgotten the icky stench of primer and the nausea that comes with it when in a small room with it for hours.  Blech.  The priming is done; I'll paint tomorrow.  Then I think we won't have a party for a while because this is not fun anymore.


January 22, 2014

I Should Learn Before I Do...

Live and learn.  Before I started with the paper clay, I did a lot of looking around online for information about how to use it with limited success.  Trying to break my habit of spending more time looking and reading than doing, I shut down the laptop and got to work.  Oops.

The paper clay head was cracking across the back of the neck and I was afraid it was going to fall off.  I slid the piece off of the dowel and found the clay on the underside of the neck still soft.  Good news!  So I rammed a piece of chopstick up the neck to give it some stability and re-wet the cracked area, packing on a little more clay to fill the crack.  I'm sure this isn't what one would read in an advice column in terms of managing cracks, but it appears to be working.  THEN I found more info on the internet about using paper clay.  Ugh, a day too late for this first piece.  There was frequent advice about building up in gradual layers to prevent cracking, as well as using more structural support than just a blob of foil in place of a brain.  Oops again.  Better luck next time.

January 21, 2014

Breaking Away from Comfortable

This afternoon started out like many other afternoons, cruising through the internet, looking at blogs and photos, hoping for inspiration, advice and help.  Trying something new with no previous instruction is hard and I wouldn't even know where to begin to try to find instruction for what I'm doing.  I decided that I wanted to try this next figurative piece using a new material, paper clay, instead of my usual polymer clay.  The instructions on the package weren't exactly helpful.   Add water if needed and wrap anything left in an airtight container, you can sand it...Ok, got it.  I didn't realize how quickly it would start to feel dry on my fingertips and I felt panicked about having to sculpt in a hurry, having little time to fine-tune it before it started to dry.


I worry about the structure and that I didn't think this through enough ahead of time.  The head is stuffed with foil, but the neck is just solid paper clay.  Will it crack?  Was I supposed to use something for armature?  Oh boy, I probably should have used a wire for added strength through whatever that thing is on his head.  I made it, I should have a sense of what it is.  I'm going to say it's a sort of hat.  Yup, it's a hat.  Now I have to figure out when it's dry enough to handle.  Maybe I'll just ignore it for a few days while I work on something else, just to be safe.  At least I made something, even if it was just a learning experience.


January 16, 2014

Cheat Day

OK, I wanted to get some art work done every day, but I keep getting interrupted with chores and errands.  I figure if I crank out a lot of those chores and errands today, that gives me a chore-free day tomorrow to play!  Today was the marathon run to the grocery store, the dry cleaner and Target for all of the cleaning supplies and household goods.  I am SO proud of myself for having been inspired by some of those nutty extreme couponers I saw on television.  I clipped a few coupons, check out the Target flyer in the newspaper and scored!  The Tide was normally about $13 each but is on sale for $8.  I had a coupon for $3 off, plus Target gave a $5 gift card if you bought two.  I refuse to do math when I don't have to, but I think I got two $13 dollar bottles of laundry detergent for $4 each!  There were a few other similar bargains, but it makes my head hurt to think about it.  Those extreme coupon shoppers are just nuts.  It was my sport for the day.

So while I didn't actually do this art today, I did work on it earlier this week.  A recent email with notices of upcoming art classes with Katherine England prompted me to pull out the goods from the soldering class I took with her last summer.  The work I did was clearly that of a newbie, not terrible, but clearly amateurish.  If I don't practice ANYthing on regular basis, everything will always appear amateurish.  I cranked up the soldering iron, pulled out some unfinished pieces and went to town.

This piece is a bit too large to wear, I think, but the point was just to practice attaching a jump ring (I used many bad words attempting this feat) and to practice adding beads of texture (not as many bad words were flying because I was laughing at my lumps). 

It's not a masterpiece, but more than anything I am happy that I just played around and enjoyed myself.

The surface of this little piece with the owl isn't quite right, but I don't know what's causing the wonky surface belmishes.  (This is where I puff out my chest a little bit, proud that I figured out how to do the little faded border thing in Photoshop).
My sister suggested I move the soldering iron along a little faster, but not keep the heating element right smack on the surface, just barely touch it.  Thank goodness Katherine told us about her tip about buying inexpensive photo frames for the glass to use for practice and projects.  The learning curve here could be expensive! 

For my birthday, my husband gifted me the most wonderful tool - a 3rd hand.  There are days where I feel like I could use more, but I think that comes from the fact that I haven't used it much.  Attaching jump rings is a lot easier now.


 Today I spent too much time on the hunt for supplies.  I can get one thing at several sites, but the prices are all over the place for the same item.  Right now I just want to find a decent glass grinder for a decent price from a place that accepts American Express (not a card tied to my bank accounts!) and that has an option for shipping other than the basketball-player-wanne-be dudes that work for UPS.  Too many packages have been bounced and tossed at my front door, including the ones marked "Fragile" in eighty-three languages.  Grrrr.

The internet is loaded with artists who make pendants like these, so I have no big dream of making a lot of money selling them.  I will enjoy making some with original little paintings or old family photos for me and other family members.  Sally Jean Alexander's book Pretty Little Things is a great source of inspiration for me.  Tomorrow, I take another whack at it.

January 12, 2014

New Year Resolution: Make Art for FUN

Boy, have I been whining and complaining a lot and not just lately!  My New Year's resolution is not going to be all about losing weight and getting into shape (I need to do that anyway), but to focus on being more positive and actually creative.

On the positive front, I stumbled across two wonderful blogs yesterday (thecartbeforethehorse.blogspot.com and allegromelody.blogspot.com ) that have completely turned around my view of my creative life and made me realize that my once creative spirit is still here, it's just been dormant for a while.  I don't need to worry about creating masterpieces to enjoy making something.

My art dolls have been my biggest stumbling block.  For years, I used basically the same construction method with a few attempts at wavering from the usual techniques.  The head and extremities were attached to the body by hand stitching with transparent thread.  After a while, that thread became brittle and the head sagged.  Without ever having taken a course in doll making and relying on trial-and-error, even consulting books and websites, I just couldn't come up with a method to make it better.  Eventually I tried another method, extending beyond just the neck to include the torso of clay.  Boy, was that a headache!  This thing has been through more - what's the word, versions?  Renditions?

The first ones I made a number of years ago (in my once cheery coloured studio in the old house)

First try adding (too much) fibers, wires and metal bits while trying to figure out the bottom half
Next I added some paint to the body and removed what I felt was excess junk on the wire

Last, I removed ALL of the fiber and spent a week adding a zillion bits of copper wire to the heavier gauge wire, painting it black, and then....nothing
 Then we moved and the movers threw this in a box and piled a lot of heavy things on top of it.  I just feel like I can't recover and this is one of those epic failures that is best just chucked aside.

Yesterday I decided to start fresh and get practice sculpting a face, but my clay is just to crumbly.  Bummer.  Time to shop for new, fresh clay.  Since I had free time, I Googled for ANY help on creating a stable neck using polymer clay and thus found these blogs.  My first thought when I started looking through the photos on one is that I just loved the artist's style and sense of decor, reminding me a lot of the home we just sold, valences I'd made for our kitchen windows, and funky art I made about ten years ago when I made stuff for the fun of it and not to sell or be graded or reviewed.  I don't know what I was going to do with this other than just test making and painting a small poofy thing.  I sure succeeded in that :-)

I made this 3" long piece about eight years ago and clearly painted it in about twelve seconds. 
This is the little guy I made years ago as well, but assembled only recently using embroidery floss as an experiment.

Today is about starting on the new path to being creative for fun, sharing with my artsy friends or friends that aren't so artsy but are curious about what I do when I'm in my studio.  This new me is going to make a note that reminds me to shut down my inner critic.  She's fired.